LogoLogo
Scripting DocsSupport
Sinespace
Sinespace
  • Welcome to Sinespace!
  • Quickstart
    • Get Started - Viewer
      • System Requirements
      • Viewer Installation
    • Get Started - SDK
      • SDK Setup
  • Sinespace Viewer
    • Viewer Basics
    • Home
    • Outfits
      • Outfit IDs
    • Socialising
    • Shopping
    • Audio Streaming
    • Settings
  • Sinespace SDK
    • SDK basics
    • Avatars
      • Clothing
        • Clothing Item Settings
        • Importing and Uploading Clothing
        • Designing Detailed Clothing
        • Layers Guide
        • Clothing Variations
        • Male Clothing Resource Files
        • Male Hair Resource Files
        • Female Clothing Resource Files
        • Female Hair Resource Files
        • Advanced Topics
          • Attachments Vs Skinned Clothing
          • Boots And Heels
          • Cloth Physics
          • How to upload avatars
            • Full Body Replacement Costumes (no custom animations)
            • Full Body Replacement Costumes (with custom animations)
      • Attachments
      • Uploading Tattoos
      • Skins
      • Gestures
        • Set Up
        • Single Person Animation
        • Multi-Person Animations
        • Animated Cameras
        • Props
        • Visual FX
      • Unified Clothing And Skin (Metal and Tessellate)
    • Animation
      • Animation Production Workflow
      • Animation Tools
    • Furniture
      • How to upload items as furniture
      • Adding Poses to Furniture
    • Games
      • Racing Games
      • Shooter games FPS
    • Quests
      • Two Step Quests
    • Regions
      • Upload Settings
      • Export Settings
      • Platform Settings
      • Submission
      • Management
      • Lighting
      • Lighting an Interior
      • Navigation bake
      • Occlusion bake
      • Post FX
      • Creating Web GL Friendly Regions
    • Vehicles
    • Components
      • General
      • List
      • Components by Function
      • AnimatedVendorConsole
      • AnimationVendor
      • ATM
      • AudioReactive
      • AvatarAnimationEffect
      • AvatarAudioEffect
      • AvatarEffect
      • AvatarEffectCamera
      • AvatarEffectCameraMovement
      • AvatarEffectLUT
      • AvatarEffectNPC
      • AvatarEffectObject
      • AvatarEffectSnapshot
      • AvatarMultiAnimationEffect
      • BoatPhysics
      • BoatVehicle
      • Browser Surfaces
      • Buoyancy
      • CarPhysics
      • CarVehicle
      • CatalogVendor
      • ClickableActivator
      • ClickableVendor
      • ClickableWebsite
      • Clothing Item Settings
      • Day/night cycle
      • EdyCompatibleVehicle
      • FocusCamera
      • FollowAvatar
      • GravityZone
      • HoverVehicle
      • InventoryVendor
      • LensFlareDistance
      • LightDistance
      • LookAtController
      • Mailbox
      • MusicZone
      • NPCCrowd
      • PlanePhysics
      • PlaneVehicle
      • Pool
      • ProductVendor
      • Proximity Activator
      • QuestCounterClickable
      • QuestCounterProximity
      • QuestDesigner
      • QuestGameObject
      • QuestNPC
      • RenamerNPC
      • SailStrip
      • SceneBackgroundMusic
      • SceneSaveSettings
      • SeatImproved
      • SliderPhysics
      • SliderVehicle
      • StartableClothingRequirement
      • StartableGestureRequirement
      • StartableItemRequirement
      • StartableRoomVisit
      • StartableSitRequirement
      • StartableSnapshot
      • StartableTeleport
      • StartableTimedCounter
      • Statue
      • StreamingBackgroundMusic
      • SubstituteAnimationZone
      • SyncedPhysicsDoodad
      • TeleportLocal
      • TeleportPad
      • TeleportWorld
      • TerrainHolePunch
      • Timer
      • Tip Jars
      • TrailForwardVelocity
      • UpgradeAccountNPC
      • VehicleRespawn
      • VehicleSpawnStation
      • Virtual Goods
      • VIPCollider
      • VoiceZone
      • Volumetric Light
      • WanderingNPC
      • Simple State Machine
      • Simple Networking
      • Vehicle Respawn Station
      • Vehicle Respawn
      • Vehicle Physical Animator
      • Clothing Previewer
      • Clothing Extra Pattern
      • Scripting Runtime
      • Speedometer
      • Modular Buoyancy
      • Meta Balls
      • Collider Trigger Activator
      • Move Object
      • Scripting Resources
      • Scripting Events
      • Scripting Data
    • Extensions
    • General Info
      • Certified Creators Program
      • Content Processing
      • Content Protection
      • Review Policies
      • Intellectual Property
      • Unity Portal
    • Creating A Shop
    • Creating Items
      • Making Animated Doors
      • Spawnable Objects: Uploading and Spawning Objects in Space
      • Creating Menus for Interactive Objects in SineSpace
    • Videos
      • Basic Clothes
      • Volumetric Lighting
  • Curator Dashboard
    • Overview
    • Items
      • Currencies
      • Editing Item Info
      • Item Statuses
    • Transaction
    • Payout
    • Grid Management
  • Sinespace API
  • Registration & Grid API
  • Grids
    • Grid Basics
    • White Label Grids
    • Grey Label Grid
    • Customisation
  • Templates
    • Avatar Templates
  • Policies
    • EULA
      • Curator EULA
      • Payment EULA
    • Review Policies
      • End-User License Agreement
    • Content Protection
    • Intellectual Property
  • More Info
    • FAQ
    • Bug Reporting
    • Support Tickets
  • World Streaming
    • Troubleshooting
    • Network ports and firewalls
    • MacOS Permissions
Powered by GitBook

Sinespace® is a registered trademark of Sine Wave Entertainment Ltd, All Rights Reserved.

On this page

Was this helpful?

Export as PDF
  1. Sinespace SDK
  2. Furniture

How to upload items as furniture

PreviousFurnitureNextAdding Poses to Furniture

Last updated 1 year ago

Was this helpful?

You can upload items as furniture items to place in room templates with the 'Edit Room' button. These furniture items can be dragged from your inventory and placed in your room. The items don't necessarily have to be furniture such as chairs, and they can be game items (like the Greedy Greedy table in the Welcome Center), a presentation tool or pieces of a structure which users can use to build a larger item (e.g. pieces of a race track).

If you want to make the furniture item sittable, you will need to add the SeatImproved component to an empty child object and parent it to the furniture. Here is a on how to do that.

Attaching the Furniture Component

1. Have the item object you want to upload as a furniture item in your scene in Unity. Once it is in the scene, click on it in the hierarchy.

2. In the Inspector window, click on 'Add Component', search for Furniture and add the 'Room Furniture' component.

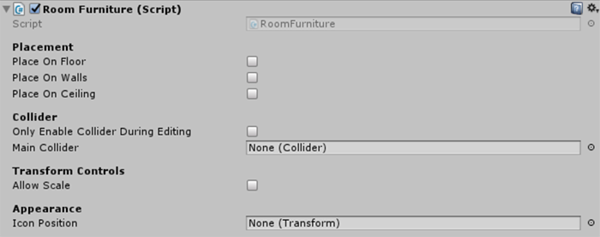
3. Once added to your object, you can change the settings to best fit what the furniture will be used for. Tick the Place on Floor box for objects such as chairs, sofas e.t.c, tick Place on Walls for things such as paintings and tick Place on Ceiling for things such as ceiling fans. If you are uploading furniture which will be placed on the floor or ceiling, make sure that the Y axis (green arrow) in Unity is facing outwards. If you are uploading furniture which will be placed on walls, make sure that the Z axis (blue arrow) points outwards (away from the wall).

4. In the Collider section of the Room furniture component, drag in the furniture items main collider. This should be done for all furniture uploads. If your furniture item does not have a collider, you can add a box collider to it by clicking on 'Add Component' and search for 'Box Collider'. You can then adjust the box collider to fit around the item. There is also the option to 'only enable collider during editing'. This should be checked if normally the collider should be disabled, e.g for particles or lights.

5. Next is Transform Controls. In here, you can check the 'Allow Scale' box if you want users to be able to scale the furniture once they place it in their room;if not, leave it as it is.

6. In Appearance, there is the Icon Position. This is the position of the blue arrow (action tag) which hovers above the furniture for users to click on to enable them to sit on the furniture.

Uploading the furniture

1. Underneath the Room furniture component in the hierarchy, you will see an 'Add Component' button. Click on this, and search for Virtual Good. Add this.

2. Once the virtual good component is added, under Basics, set the Type to Furniture then the Category to the appropriate category.

Fill in the rest of the virtual good component with the information for your item and then upload the item to Sinespace.

tutorial