Virtual Goods
Overview
The Virtual Goods component is added to any item you upload, whether it is for sale in the shop or for your own use, including content used in your regions.
The Virtual Goods component is added to any item you upload, whether it is for sale in the shop or for your own use, including content used in your regions.
The component is divided into tabs so you can fill in the required information more easily.
Basic
Use the Basic tab to set the content type, category, audience rating, and customization options.
Content Type is where you choose the broad content category. For example, choose Clothing when uploading an item of clothing.
Category places the item in the correct shop category. For example, if the content type is Clothing and the item is a jacket, choose Clothes > Tops > Jackets.
Audience Rating lets you choose the rating for the item. The available ratings are Everyone, Teen, Mature, Adult, and Explicit. This section also includes checkboxes for content such as violence or adult content.
Customization Capabilities controls how much in-world customization is allowed for the item. Options include basic, disallowed, full, and source access. The editor shows a short explanation when you choose an option.
The Pet type is currently locked and is no longer used. To create a following minion-style pet, choose Generic to set it as a spawnable item, then use the pet category if you want to place it in the shop.
Detail
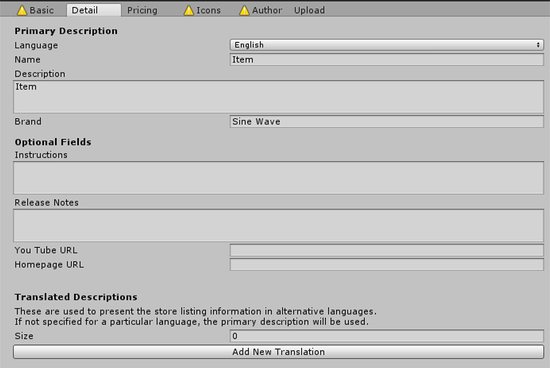
Use the Detail tab to add the primary description, optional fields, and translated descriptions.
Primary Description is where you add the item name and description. Include any special instructions, graphics requirements, file size notes, or other important details.
Add your brand name here as well.
Optional Fields are not yet shown in the shop. This is an upcoming feature.
Translated Descriptions lets you add translations for the item name, description, instructions, and release notes. Click Add New Translation, choose a language from the drop-down, and enter the translation. You can add multiple translations.
Pricing

Use the Pricing tab to set the item price and promotion limits.
Enable Not for Sale if you want to upload an item for personal inventory use without listing it in the shop.
Price Gold sets the item price in Gold, the premium currency. To sell an item for Gold only, enter -1 in the Silver field and enter the Gold price.
Price Silver sets the item price in Silver, the base Sinespace currency.
Promotions controls whether the item can be used in seasonal or promotional sales. Enable Allow use in Promotions to make the item eligible, then set the maximum discount from 0 to 100 percent.
Icons
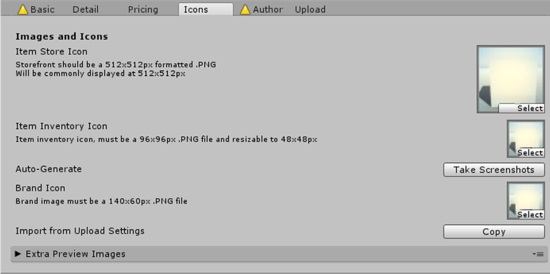
Use the Icons tab to add the item store icon, inventory icon, and brand icon.
Image Store Icon is used for the item in the Sinespace shop. You can create it outside Unity and add it to the Project window, or click Take Screenshots to auto-generate it. This also auto-generates the inventory icon. It may take a little time for the generated images to appear.
The Brand Icon is the image used for your brand. You can copy it from Upload Settings in Unity.
To add brand information to Upload Settings, click Space > Upload Settings in Unity. Under Defaults, add the brand name, brand icon, copyright label, and default inventory icon.
After those defaults are set, return to the Icons tab on your item prefab and click Copy under Brand Icon to copy the brand information from Upload Settings.
You can also add the brand icon manually by importing the image into the Project window and dragging it into the Brand Icon field. The brand image must be a 140x60 PNG.
You can add extra preview images for the shop by expanding Extra Preview Images and adding images. Preview images should be 1024x1024.
Copyright
Use the Copyright section to enter the developer name and copyright information.
The developer name can be your business name or your individual name. For the copyright, add your name or business name after the copyright year.
You can also add copyright information in Upload Settings so it can be copied to other components.
Upload
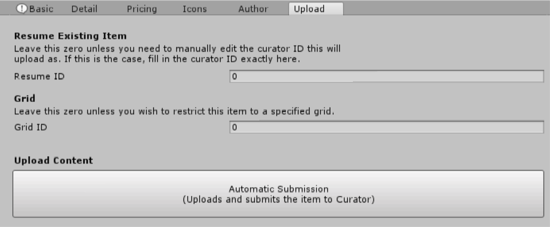
Use the Upload tab to add upload information for the item.
Status shows whether you have already uploaded the item to Curator.
Resume Existing Item lets you enter a resume ID when re-uploading an item. This overwrites the old version. You can find an item's resume ID on curator.sine.space, or in Unity under Space > Items and Status.
Grid lets you enter a grid ID to restrict the item to a specific grid.
Upload Content includes an automatic submission option. This submits the item for upload to Sinespace.
After the item is on Curator, the Sinespace team reviews it. If it passes review, the item goes live in Sinespace.