AudioReactive
To set up your scene in Unity for the audio reactive components, you need to first either drag an audio file from your PC into the project window, and then into the hierarchy, or for music streams, you need to (info).
Contents
- 1 Audio Reactive Transform
- 2 Audio Reactive Lighting
- 3 Audio Reactive Animation
- 4 Audio Reactive Material
Audio Reactive Transform
This component can be attached to the 3D object you want to react to the music and then used to transform the 3D object in time to the audio.
You can transform the object within the component, so you can set the object to scale, rotate or move in certain directions.
To add this component to your object, select the object in your hierarchy and under the Inspector window on the right, click on 'Add component'. Search for audio reactive and choose 'Audio Reactive Transform'.
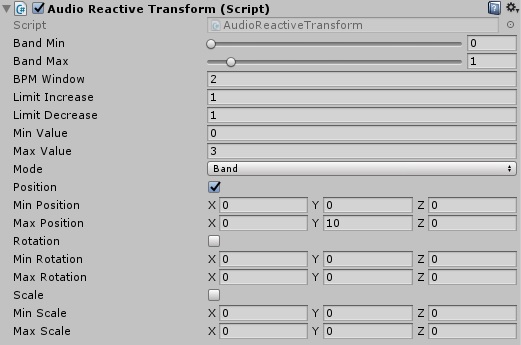
Band Min and Band Max
There are different types of bands for the different frequencies in audio. For example, if you want the object to move to only the bass of the audio, you will need to set the band min slider to 0, and the band max to 1. You can play around with the different values until it matches the audio band you want the object to move to.
BPM Window
The BPM Window Limit defines how many seconds to analyse for determining the BPM. So, for example, if you set this to 3, it will listen to the last 3 seconds, if you set it to 10, it will listen to the last 10 seconds.
Limit Increase/Decrease
The limit increase/decrease determines how quickly the values can change. If you have fast paced music and want the object you have to react faster to the audio, you can change the limit increase/decrease to 10,000+ to make the object move very quickly in time to the audio.
Min Value/Max Value
These determine how quick the reactions are, so you might want to set these values to your liking.
Mode
This sets the mode to BPM or Band.
Position
This will change the objects position when checked. You can set how far the object will move and in which direction on the Z,Y and X axis in time to the audio.
Rotation
This will change the direction in which the object is rotated when checked. Again, this will set which way the object will rotate on the Z,Y and X axis in time to the audio.
Scale
This will change the size/scale of the object when checked. The object can be scaled in any direction on the Z,Y and x axis separately, or you can set the same value in all of the axis's to make the object scale uniformly.
Audio Reactive Lighting
Audio reactive lighting will enable lighting to react to the audio you choose. Audio reactive lighting will work with lights which don't need to be baked, such as spot lights, directional lights and point lights.
To add the audio reactive lighting to your light, click on the light you want to use in your hierarchy, and under the Inspector window, click on 'Add Component'. Search for audio reactive and choose 'Audio Reactive Light'.
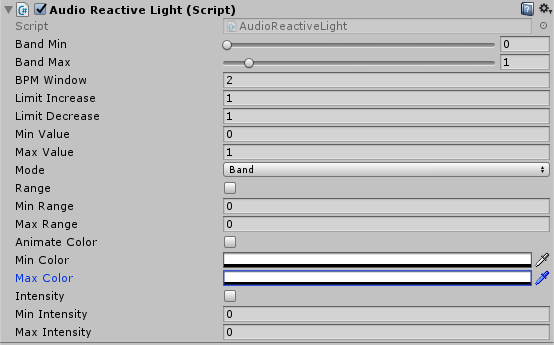
Band Min and Band Max
There are different types of bands for the different frequencies in audio. For example, if you want the object to move to only the bass of the audio, you will need to set the band min slider to 0, and the band max to 1. You can play around with the different values until it matches the audio band you want the object to move to.
BPM Window
The BPM Window Limit defines how many seconds to analyse for determining the BPM. So, for example, if you set this to 3, it will listen to the last 3 seconds, if you set it to 10, it will listen to the last 10 seconds.
Limit Increase/Decrease
The limit increase/decrease determines how quickly the values can change. If you have fast paced music and want the object you have to react faster to the audio, you can change the limit increase/decrease to 10,000+ to make the object move very quickly in time to the audio.
Min Value/Max Value
These determine how quick the reactions are, so you might want to set these values to your liking. When working with lighting, you might want to lower these values so the lighting colors blend quickly together.
For example, setting the min value to 0, and the max value to 0.1, will mean that lights react quickly to the audio and they also blend and change colors faster.
Mode
This sets the mode to BPM or Band.
Range
When range is checked, this will change the distance range of the light. For example, set the min range to 1 and max to 5 for a small circle of light.
Animate Color
When this is checked, this will enable the light to blend the min color and max color you have chosen.
Intensity
This will change the intensity of the light. The lower the values, the dimmer the light will be, and the higher the values are, the brighter the light will be.
Audio Reactive Animation
Audio reactive animation will enable a 3d object of your choice to move to audio.
This component has a bit more to it than the other audio reactive components, but it is still a simple process to set up.
Click on your object in the hierarchy, and under the Inspector window, click on ‘Add Component’ and search for ‘Audio’ then choose ‘Audio Reactive Animation’.
When this is done, click on ‘Window’ at the top of Unity. On the drop-down menu, choose ‘Animation’. This will add an Animation tab at the bottom of the screen.

Click on ‘Create’ in the animation tab, and when the Explorer opens, save the animation anywhere you want to save it.
Now in the Animations tab, click on ‘Add property’. This will open up a menu with three options; Transform, Mesh Renderer and Box Collider. For audio reactive objects, the best option to choose are Transform and Mesh renderer.
Transform
Transform has more options on the drop down menu. To expand Transform, click on the arrow next to Transform. You will see three more options.
Position
This will allow you to change the position of the object along the X,Y and Z axis.
Scale
This will scale the object along the X,Y or Z axis, but also let you scale uniformly.
Rotation
This will rotate the object.
Mesh Renderer
Mesh renderer is used for changing the object’s color or material. When you click on the arrow next to mesh renderer, this will show a lot of options, but they are all related to materials and color.
Choose from either one of the transform options or mesh renderer options, and then click on the ‘+’ sign next to the option.
You can add more than one transform option or mesh renderer option to make the animation more complex.
I have chosen to scale to my object, so I clicked on the plus sign, and two diamond shapes will now show in the animations tab on the timeline. These diamonds are key frames for the animation. The timeline is measured in frames and in seconds.
Click on the key frame at the beginning of the timeline, and you will that it highlights blue. To make sure that the scale values you put in show up in your animations, put the scrubber (red line) over the key frame.
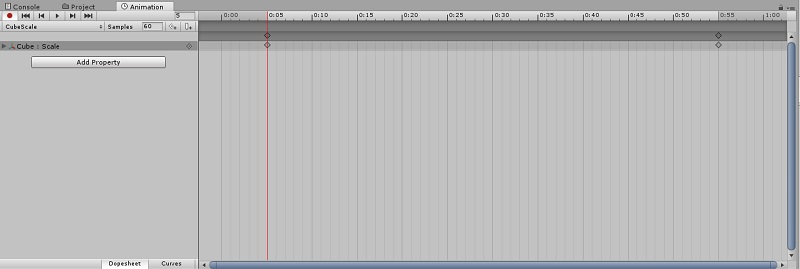
There is another key frame at the end of the timeline. Drag the scrubber to this key frame, and then change the values of scale again. I am changing mine to 2,2,2.
If you want to add more keys, move the scrubber to the position on the timeline where you want to add it, and right click near the scrubber and choose ‘Add Key’.
The more keys you add, the more precise the movements will be.
Here is my finished timeline.
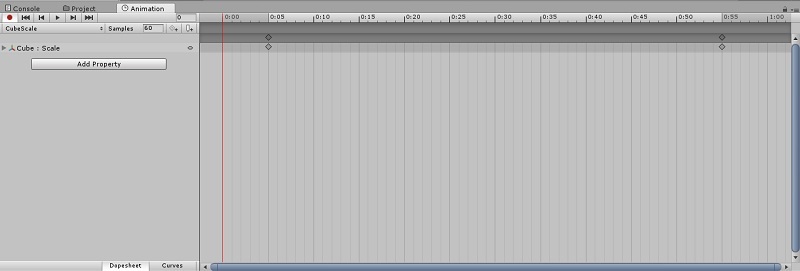
I have just made a very simple scale transition from 1,1,1 at the beginning to 2,2,2 at the end.
Making the Animation work with Audio
To make the animation work with the audio, you now need to click on ‘Window’ at the top of Unity and choose ‘Animator’.
When the Animator window is open, it will look like this, with the name of your object and the animation type in an orange box.
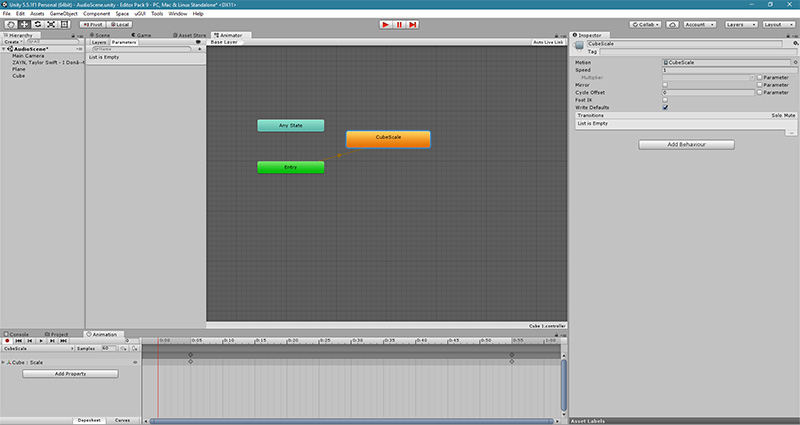
Click on your animation in the orange box. On the left hand side, you will see ‘Layers’ and ‘Parameters’.
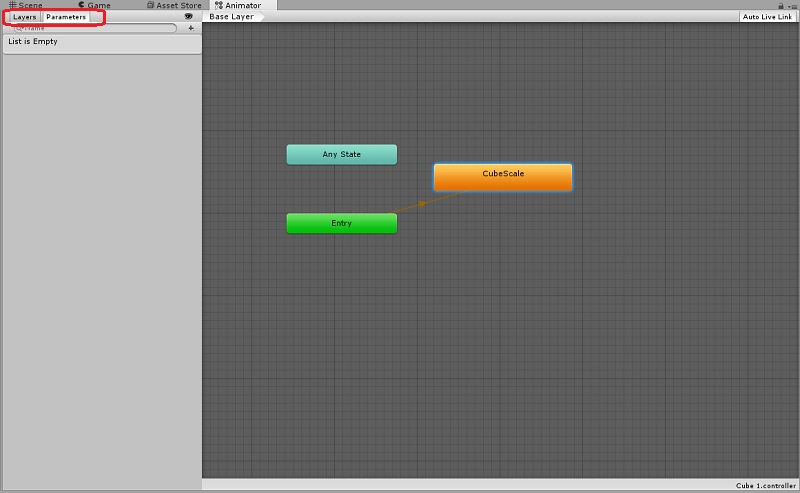
Click on Parameters if it isn’t already selected, and then click on the ‘+’ sign underneath.

When menu appears, choose ‘Float’. This will show a ‘New Float’ directly underneath the plus sign.
Rename this float ‘Audio’, exactly as it is shown here, with a capital A.
Now, click on the orange box again, and in the Inspector window, you will see these settings.
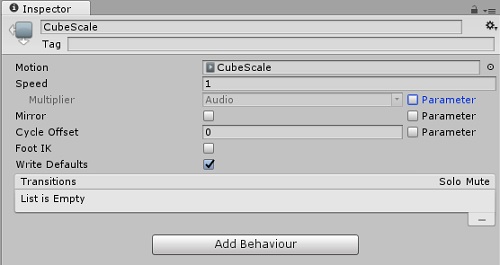
You can change the speed of the animation if you want it to be faster or slower, but for this example I am keeping mine on the default of 1.
In the Multiplier setting, click on Parameter next to it, and this should automatically choose ‘Audio’.
The animation is set up to work with the Audio!
Go back down to your Animation tab, and un-check the record button, then click on your Scene tab.
Now you can click on ‘Play’ and see if the Animation is working with the Audio.
You will need to select the band you want the object to react to in the Audio Reactive Animation component in the Inspector window.
You can adjust the settings in the Audio Reactive Animation component until you are happy with the result.
Audio Reactive Material
Note: Audio Reactive Material is working in the experimental editor pack